
Hello lovelies! I had a wonderful day at AQC today (the Australian Quilter's Convention in Melbourne). I was mostly well-behaved, only buying a few fantastic fat quarters and only one new doo-dad tool for making baskets! I was demoing my Owl and how to make a couple of fabric flowers today at the convention and as I promised to all the wonderful ladies who stopped by to say Hi, I have the pattern instructions and downloadable template here for you all. I will post the flower tutorial tomorrow.
So, here he is, my little Pocha Owl:


Lastly, leave a comment if you like my pattern or have any suggestions :)
Love from Pinky the Toy Maker xoxo
So, here he is, my little Pocha Owl:
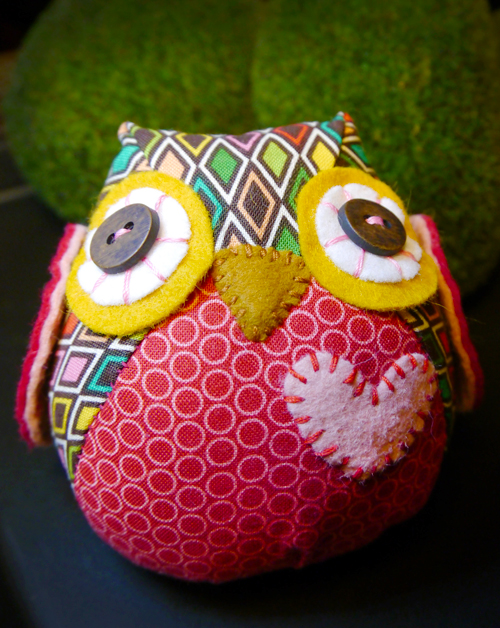
I call him my little Pocha Pocha Owl because he's a a cute fat little version of traditional Japanese owl toys ('Pocha' is Japanese for chubby). When I went to Japan a few years ago they had these cute little fellows all over the place. I wanted to make my own when I got home but couldn't find a pattern I liked so I made up my own and added wings and a little heart which aren't traditional.
Like most of my patterns, this little fellow has been designed to utilize your favorite scraps and button stash. I have included variations for the wings, you can either make them from felt (easy) or make them from fabric (intermediate) instructions for both variations are of course included :)
INSTRUCTIONS
Step 1
Cut out your Tummy, Base and Body from your chosen patchwork fabric scraps. Cut out your Beak, Eye Colour, Eye White and Eye Black from felt scraps. Decide whether you wish to do felt wings or fabric wings, cut out 2 pairs from your chose material using the relevant template. Cut your Base Template out of plastic such as template plastic or a clean ice-cream container lid.

Step 2
Pin and stitch one side of the tummy piece to body piece matching and finishing at the black dots marked ‘A’. Repeat for the other side of the tummy attaching it to the other side of the body.

Step 3
Fold the body in half and sew the seam between dot ‘A’ and dot ‘B’. Turn the body right side out.
Step 4
Use a needle with strong thread to sew a gather stitch around the bottom opening of your owl’s body. Draw up the thread a little and stuff the owl but avoid stuffing the top of the owl as this part will fold down to ‘shape’ your owl. Finishing drawing up the gather stitch and tie securely leaving an opening no greater than 1 & 1/2 inch wide.

Step 5
Sew a gather stitch around your base piece. Draw in your gather stitch just a little, then place your plastic base in the middle of your fabric base and draw your gathered in tight around it. Tie off your thread tightly.

Step 6
Position your base over the opening at the bottom of your owl. Stitch your base down to cover the opening until you get three quarters of the way around. Add extra stuffing if required and then finish stitching the seam closed.

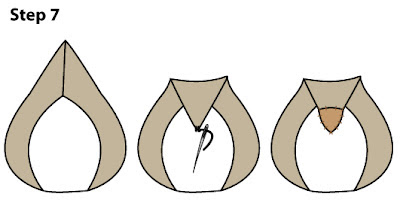
Step 7
Fold the top of your owl down to shape the head. Tack the point in place with a couple of stitches. Now, take your felt beak piece and position this over the point. Stitch in place.

Step 8
Take an Eye White piece and use the paper template to mark the center point with a marker. Position the Eye White on the top of an Eye Colour piece and stitch in place with top-stitch thread. Repeat this step for the second Eye White and Eye Colour pieces.
Step 9
Take one of your Eye Black pieces, place and stitch it in the center of your Eye White and Colour piece. Repeat this step for the other eye pieces. NOTE: You could use black buttons instead of the black felt piece too, I just avoid using buttons on toys intended for children under 2 years or for pets.
Step 10
Pin both completed eye pieces to your owl, positioning them one either side of the face next to the beak. When you are happy with the position of the eyes, stitch them to your owl’s face.

Step 11
Your little owl is almost finished! The last thing we need to do is to make his wings. You can make the wings 2 different ways. The first way is to make the wings from fabric:
Fabric wings
Take two fabric Wing pieces and pin them right sides together. Using the template as a guide, sew around the wing leaving an opening. Trim your seams back by half and clip carefully into the curves so that they sit flat later. Turn your wing right side out through the opening. Press your wings with a hot iron to neaten the seams. At this point, add a little stuffing to the wing if you wish. Stitch the opening closed. Repeat this process for the second wing.
Felt wings
Take a felt wing piece and embroider your desired design. Take another felt wing piece (the one you want as the underside) and pin it to the back of your embroidered wing, wrong sides together. Neatly stitch around your wing with a decorative stitch of your choice and note that the back stitching will be visible on the underside of the wing. Repeat this process for the second wing. 
Step 12
Now to attach the wings to your owl. Use a pin to position your wings either side of your owl’s body. You can then either:
- stitch the wing straight to the body using strong thread creating a ‘cross’,
- whip-stitch the top edge of the wing to the body which creates the best ‘flapping motion’,
- or you can use buttons to attach your wings.

CONGRATULATIONS! Once you have attached your wings, your little Pocha Pocha Owl is finished :)

Please feel free to make as many owls as you wish for friends and family. I’m also happy for you to use this pattern to teach sewing students or to sell to make money for charity and school fundraisers. The only restriction is that I don’t allow my patterns to be used on a commercial scale; I’m all about keeping it personal, sustainable, handmade and full of love.
Lastly, leave a comment if you like my pattern or have any suggestions :)
Love from Pinky the Toy Maker xoxo
24 comments:
Very cute! Thanks for posting this pattern. I've been looking to make one of these, and was finding other patterns that had entirely the wrong shape. You're is perfect! =D
Thank you very much for your lovely comment Mrs H, very happy sewing!
xoxo Pinky
He is amazing and can't wait to have a go making him but I'm a novice and wondered if you could give me a list of materials? Xxx
I was wondering what the scale on these were, or is it whatever you feel like at the time?
So dang cute that my daughter wants me to make her one - she found your post pattern. Thank YOU for the pattern!!
Thanks for sharing your talent, time and patterns. ;)
Thank you for sharing your talent, time and beautiful pattern. ;)
Thanks for sharing your talent, time and patterns. ;)
so dang cute! i need to make one for my new baby grand daghter and grand son! i'm pickled Tink!
I love it! I just want to have some free time to try it :) thanks for the post and the patterns, it is a very cute design
Muchas gracias por el patrón y el tutorial, es un buho muy bonito, besos
this will be so fun to make. I love that you shared with us for free! thanks so much.
Thank you soooooooooooooooooo much for sharing such a fantastic tutorial.. I cannot wait to make it muself with felt and fabric... Great stuff.. thanks!!
Thank you for this wonderful owl pattern. I will be using it for an swap partner, I am sure she will love it too!
Can anyone explain to me what the enlargement size should be on printing out the pattern?
For those curious about enlarging the pattern, here's the answer: you have to go to the top of the page where the pattern is and click the print icon that is located toward the left side of the page... that should give you a full size pattern--
This owl is soo cute I am going to make them for my twins for their birthday!! I am so excirted. The instructions are so well written! I would love it if it was bigger though. Any suggestions on how to make him about 2x the size? I want to put rattles in their bellys but they are so small i don't think they will fit...
I was wondering if there's a way to do the eyes without felt? I don't have any felt in my fabric scraps, mostly quilter's cotton.. It's so cute! thanks for posting :)
Awesome Owl...so well done!
Thanks for sharing it out to
all..highly appreciate it..
just cant wait to sew it.
20/12/14
Soursquirm
Kuala Lumpur
great pattern easy to follow my granddaughter will love to do this with me
He is just adorable, I cannot wait to make him, thanks for sharing.
Larain
I love these little owls and plan to do them with my granddaughters for fun. I was wondering about the steps though. In order to sew with buttons it seems like you would need to sew them on before stuffing both on the wings and the eyes. Is that what you did?
Thank you so much for sharing your pattern!
Jayn
I don't understand for the owl.
Fold the body in half and sew the seam between dot ‘A’ and dot ‘B’. Turn the body right side out. If I sew only A to B it is not full enclosed. The next step says to gather the bottom which is a full circle?
Love this owl
I put a pouch of lavender or a blend of sandalwood,frankincense and wild orange in mine for gifts. Looked lovely and smelled divine.
Min
Post a Comment